Showing posts with label Gebak. Show all posts

16 July 2014

Winter Wakker-Word Wafels


Winter Wakker-Word Wafels!

Wafels in die winter, wat 'n wenresep! Veral om jou vroegoggend uit die bed uit te kry!

Boonop is daar niks lekkerder as 'n warm ontbyt en/of tuisgemaakte wafels in die winter nie!

Ek bedien dit graag met vrugte, indien vir ontbyt, en met roomys en/of Nutella as 'n nagereg!


14 July 2014

Winter Woepa Pasteitjies

Ek het 'n tydjie terug die voorreg gehad om Huiskok Errieda du Toit te ontmoet! Lees gerus meer oor Errieda du Toit op haar blog Huiskok. Jy kan haar ook volg op Twitter @Huiskok. Soos een 'foodie' aan 'n ander het sy my aangehuts om 'n nuwe resep te probeer - die Whoopie Pie! Met die opwinding van die lieflike ontmoeting en 'n pasgebore inspirasie kon ek myself nie keer om alreeds gisteraand in die kombuis te werkskaf aan my eie tuisgemaakte Woepa Pasteitjies nie!

The Whoopie Pie: "While considered a New England phenomenon and a Pennsylvania Amish tradition, they are increasingly sold throughout the United States. According to food historians, Amish women would bake these desserts (known as hucklebucks, or creamy turtles at the time) and put them in farmers' lunch pails or lunch boxes. When farmers would find the treats in their lunch, they would shout "Whoopie!" It is thought that the original Whoopie pies may have been made from cake batter leftovers." (Wikipedia, November 15, 2012)

Daar is 'n groot verskeidenheid en moontlikhede van kleure en geure wat jy in jou Winter Woepa Pasteitjie kan inkorporeer. Ek het besluit ek gaan die tradisionele klam sjokoladekoek beslag gebruik, maar in plaas van room/roomkaas in die middel het ek my pasteitjies met 'n kondensmelk sjokolade toffie vulsel gevul..mmm!!

8 February 2014

I Love {Baking} Pudding & Poetry

Photo: I Love Baking SA - Stork

For my sweet sweet Valentine,
I'd serve a rich Quick Chocolate Fondue
Maybe he'd like some olives in brine,
or a Sweetheart Cookie big enough for two.
 
No need to worry and no need to look,
Stork's Saucy Choc Pecan Pudding is what I'll serve,
and bonus, it's all online in their Facebook recipe book,
a recipe made with love, that's what they deserve!
 
In the KoekiesEnCream kitchen I'll bake and play,
until I have a delicious Saucy Choc Pecan Pudding,
Perfect for Valentine's Day!

If you also want to try out the Saucy Choc Pecan Pudding recipe click here!
 

14 January 2014

Chocolate {Ganache} Cake

This is by far the best Chocolate Cake to bake! Rich and creamy and OH sooo sweeeet! Perfect for dessert or served with well...I don't want to serve it with anything...it's just so deliciously rich in Chocolaty flavours & textures! Dark Chocolate, Milk Chocolate, Chocolate cookie crust crumbs...  


Recipe by Hestelle Pretorius

{For the cake}

400g dark chocolate
1/4 cup castor sugar
100g Stork bake
1 tbsp. flour
4 medium eggs
 
{For the crust}

1 packet Oreo biscuits crushed
 
{For the ganache}

190ml fresh cream
200g milk/dark chocolate

Preheat the oven at 200*C 
Grease and line a round cake tin (20cm)
 
For the cake, melt dark chocolate, 1tbsp castor sugar and Stork bake in a glass bowl over boiling water, set aside.
In a medium sized mixing bowl beat the eggs and the rest of the castor sugar until light and fluffy and has a light yellow colour.
Fold in the tablespoon of flour. 
Then fold in the melted chocolate mixture.
Scatter the Oreo biscuit crumbs to form the crust of the cake, about 6mm thick at the bottom of the lined and greased cake tin. 
Pour the cake mixture on top of the crust and bake for 13minutes. Take the cake out of the oven and refrigerate for 4 hours until set. 

In meantime melt the milk/dark chocolate and cream in a glass bowl over boiling water. Stirring occasionally.
Pour over cake after the cake has set for the above mentioned 4 hours.

Refrigerate for another 2hours and serve!

 
 Photos by Günther Schubert

7 November 2013

In the Mix{ed} Berries Mini Cheesecakes

It's been a while since I've looked through a few cheesecake recipes. Maybe it's because a slice of cheesecake to me is a delicacy! It must be rich, velvety, smooth and not too big a slice. Just enough to walk away with a satisfied smooth smile!
 
Today's recipe isn't aimed at being a cheesecake cupcake, it's simply an easy way of baking a cheesecake and making serving it to your guests so much easier, prettier and fun! I made plain cream cheese and condensed milk mini cheesecakes with a choc chip crust, topped with a mixed berries jam (in syrup). Follow the post as I explain how I made these perfect sweet and sour cheesecake delicacies!


{Ingredients}
 
For the crust:
 
1 packet choc chip cookies (290g)
100g Stork Bake
 
For the filling:
 
3 large eggs (separated)
2 tubs cream cheese (480-500g)
3ml vanilla essence
160ml castor sugar
2 tbsp. maizena
250ml condensed milk
 
For the topping:
 
I used a store bought mixed berries jam (in syrup). Quick and easy. This way you can please all your guests by having a variety of toppings for them to choose from. *Serving suggestion: Serve your mini cheesecakes with mini jam jars on a tray.


{Method}
 
Preheat the oven 180*C.
 
For the crust:
Melt Stork Bake in a heatproof bowl in the microwave or in saucepan on the stove.
Crumbed choc chip cookies in a food processor or crush them in a heavy duty plastic bag.
Mix the crumbs into the melted Stork Bake.
Line a cupcake tin with cupcake wrappers and put an even amount of cookie crumbs in each wrapper (you will need about 24 cupcake wrappers).
With the back of a spoon even out the cookie crumbs in each wrapper to make a compact cookie crust.
Put it in the fridge while preparing the filling.
 
For the filling:
Beat egg yolks and 50ml castor sugar together until light and fluffy.
Add maizena and beat until smooth.
Add cream cheese, condensed milk and vanilla and beat until smooth.
In a separate bowl beat egg whites until soft peaks form and then add the rest of the castor sugar (110ml) while beating the egg whites until smooth and creamy.
With a wooden spoon fold the egg whites into the cream cheese mixture, do not over mix.
 
Take the cupcake tin with the cookie crust filled cupcake wrappers out of the fridge and pour an even amount of filling into each cupcake wrapper.
Bake for 30-35 minutes at 170*C.
DO NOT bake the mini cheesecakes for too long otherwise you will have very dry and crumby textured mini cheesecakes.
REMEMBER: you want the texture to be smooth and velvety.
 
 
{Tip} Rather keep your eye on the oven and have your cake tester nearby. The middle of the mini-cheesecakes might not seem 'ready' yet, but remember it still needs to set while cooling down.
 
Enjoy!

17 September 2013

Tuisgemaakte {Sjokolade} Tennisbeskuitjiekors!

Ek het onlangs 'n Peppermint Crisp Tert geplaas met 'n heerlike Tennisbeskuitjiekors. Vandag het ek besluit om my eie weergawe van 'n tennisbeskuitjie te bak - 'n sjokolade een! Hierdie beskuitjiekors neem effens langer as die gewone krummel- of broskors omdat jy eers die tennisbeskuitjies self moet bak, maar dit is 100% die moeite werd.
 
Die heerlike heuning en klapper geure werk fantasties saam met 'n tikkie sjokolade - kakao. Hier is die resep:
 
 
{Bestanddele}

100g sagte botter
1 k suiker
80g bruinsuiker
1 k meel
1 eier
1 teelepel koeksoda
1 k klapper
3 eetlepels heuning
1 ½ eetlepels kakao
1 teelepel vanilje
 
{Metode}
Klits botter en suikers saam tot romerig. Voeg eier en vanilje by. Sif droë bestanddele in en meng goed. Voeg heuning en klapper by en meng deur. Op ‘n gesmeerde bakplaat (dit sal ongeveer twee bakplate neem), plaas ongeveer 2cm deegballetjies op die bakplaat en bak vir 10 minute op 180*C. Plaas die klaar gebakte koekies op ‘n droograk om af te koel.
Wanneer die koekies heeltemal afgekoel is, plaas hulle in ‘n deursigtige sterk plastieksak en kap die koekies fyn. Smelt 3 eetlepels botter en meng dit tesame met die gekrummelde koekies in ‘n mengbak. Gooi nou die koekie- en bottermengsel onder in die gesmeerde losboom koekpan, versprei dit eweredig en druk plat sodat die koekies ‘n netjies beskuitjielaag onder in die koekpan vorm. Sit in die yskas terwyl jy die res van jou gekose tert voorberei.
*Die sjokolade tennisbeskuitjiekors smaak heerlik met 'n sjokolade yskastert of met 'n pepermenttert bolaag!
 

21 August 2013

Pine{Apple} Crumble

Apple Crumble is most definitely one of my father's favourite desserts and tea-time treats of all time! This dessert is not only a very comforting dessert because of the lovely Cinnamon smell that fills up the kitchen once you open the oven door, it is also one of the most versatile ones.
 
Whether you like peaches, pineapples, apples or pears, you can probably 'crumble' any fruit that you would like to. Yesterday, I walked into Pick n Pay only to find the freshest Granny Smith green apples that I have had in years. On my way through the fresh fruit and vegetable section I picked up a lovely yellow pineapple as well. Although I didn't mean for it to become a dessert, I came home and thought that while I do love sweet, sour and a little bit of spice together, I'd like to try these two together, in a crumble - pineapple and apples. Today I'm making Pine{Apple} Crumble!
 
{See Easy-to-find Pick n Pay Shopping List below}
This dessert serves 4-6 people.
 
 
This is what I did:
 
{Ingredients}
 
Fruit layer:
 
4 medium sized Granny Smith apples, sliced
Half a pineapple chopped into squares/slices
45 ml traditional golden syrup
40ml caramel sugar


Crumble:
 
1 cup cake flour
1 tsp baking powder
1 heaped tsp ground cinnamon
5 tbsp castor sugar
80g Stork Bake + 1 tsp to butter/grease pie dish
2 tbsp chopped cashew nuts


{Method}
 
Butter/grease a medium sized pie dish with Stork Bake. Place the sliced apple and pineapple pieces in the pie dish to cover the base of the pie dish. Because of all the lovely crumble that will be on top I decided not to make a crust. Evenly pour the golden syrup and then the caramel sugar over the fruit base.
 
In a food processor mix together the cake flour, baking powder, cinnamon, sugar, cashew nuts and Stork Bake until a crumb-like texture forms. Cover the fruit base with the crumb mixture.
 
Bake at a 190*C for 40-45 minutes until the crumbs are light brown and the caramel syrup is bubbling on the sides of the pie dish.
 
*Serving suggestion: Preferably serve warm with custard, whipped cream or ice cream. My dad loves his Crumble and Custard mix! 


{Easy-to-find Pick n Pay Shopping List}
 
 
This post is sponsored by


7 August 2013

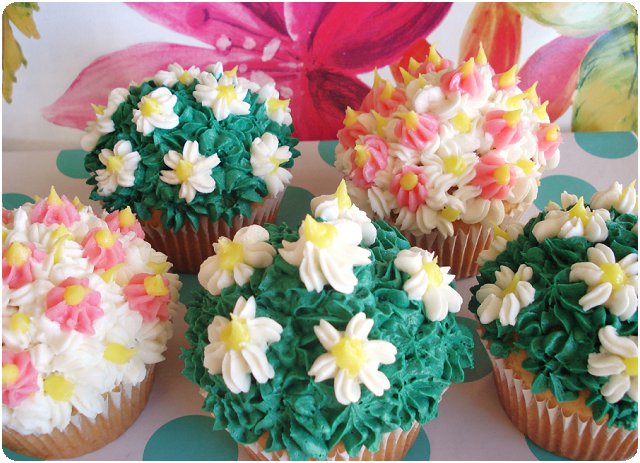
{Vrouedag} 'n Dag vol Daisies

Daar is niks so vrolik soos vars blomme in die huis nie. Die gesiggies wat loer en kyk waar die volgende sonstraal in die kamer gaan deurbreek. Dit is die bloeisels voor my kamervenster wat my vanoggend aan die Daisy blommetjie laat dink het.
 
Die naam 'Daisy' kom van die woorde 'Day's eye' af, omdat die blommetjie gedurende die dag oopmaak en weer toemaak in die nag. Daar is net iets spesiaals en eenvoudig aan 'n bossie Daisies en ek kon myself net nie keer om kolwyntjies te maak wat nes hierdie beeldskone, stralende en 'onskuldige' blommetjies lyk nie. Met oor die 12 000 Daisy spesies wat beskikbaar is, het ek besluit ek wil die een namaak wat aan ons almal bekend is, die wit Daisy.
 
Pragtig, skoon en suiwer en tot vandag toe is die wit Daisy alombekend as 'n geskenk van suiwere liefde. Dit is ook hoe ek vandag se Daisy kolwyntjies beskryf - vol KoekiesEnCream liefde! Lente loer vir ons! Hierdie is die perfekte geskenkie vir jou ma, suster, dogter of vriendin om hierdie Vrydag Vrouedag te vier!


22 July 2013

{Chocolate} Ganache Mousse Meringue Cake

This is a must-try, must-eat delicious chocolate delight! You can call it a mini-cake, a giant petit four, a crunchy mousse or as I'd like to refer to it: A Dark Chocolate Ganache Mousse Cake! I had the privilege of making a similar dessert to 24 foodies at the Pick n Pay #WinterFeast in collaboration with Food24. However I decided to blog a much more homemade-friendly dessert with two basic elements. A meringue layer and a thick mousse layer.
 
This dessert is a combination of one of my favourite trending cakes, called the Naked cake and a thick ganache, which can also be enjoyed as a mousse on its own. But instead of making the cake layers with sponge cake, I layered these little cakes with Chocolate Meringue!! The soft rich texture of the dark chocolate ganache mousse is contrasted by the soft and light crunch from the chocolate meringue layers!

{Warning} This is a very rich dessert and you might just get addicted to it!
{Easy-to-find-Shopping-List and recipe below}


{Ingredients}
 
For the Dark Chocolate Ganache Mousse:
 
180g Bournville Dark Chocolate
9 Marshmallows
1/2 cup Fresh Cream
*Optional: 2 tbsp. Red Wine of choice - really enhances the Dark Chocolate flavour.
 
For the Chocolate Meringue:
 
3 egg whites
2 tsp cocoa
150g castor sugar
 
{Method}
 
For the Dark Chocolate Ganache Mousse:
 
Melt chocolate and marshmallows in a glass bowl over boiling water. Add fresh cream little by little to keep the chocolate from burning. Lastly, add wine and mix well. Refrigerate for at least 1 hour. Then spoon into a piping bag - it just makes layering the cake with chocolate mousse much easier.
 
For the Chocolate Meringue:
 
Beat the egg white until soft peaks form. Sift castor sugar and cocoa together and add into the egg whites little by little. Beat egg mixture until glossy, smooth stiff peaks start to form. Line a baking tray with wax paper and spoon egg white mixture onto the lined baking tray to form heaps of approximately 3-4cm in diameter. Bake in a pre-heated oven for 20-30 minutes on 200*C. Do not open the oven door unless the meringues are completely baked as they will collapse and the smooth textured meringue will become wrinkly and flat. A good idea might be to test your oven with one meringue first to establish the heat of your oven. If your oven has a dry baking setting, try it. Remember - the meringues needs to bake on the inside as well!
 
{Serving}
 
Wait for the meringues to cool down. Then layer the cake starting with one layer meringue and then a layer dark chocolate ganache mousse. Continue layering until you have your desired serving size. Dust with a little cocoa powder or icing sugar.


{Easy-to-find Pick n Pay Shopping List}

This post is sponsored by


5 July 2013

Maklike Sjokkie Modder Blokkie*


This morning I baked a Quick Chocolate Pudding {Click here to view the video} on the Expresso Morning Show - SABC3. Exactly two years ago I blogged this beautifully scrumptiously looking pudding - the recipe slightly different however. So let me share my version of it with you once again! I just simply couldn't resist taking a bite this morning - even though it was only 08h20 at the time ;)
 
Photo by Günther from Vörsprung Studio via Instagram

 
If you want the Expresso Recipe {click here}, my recipe to follow.
 

Daar is niks lekkerder om wakker te word na 'n Sondagmiddagslapie, na die kombuis toe te sluip en aan die orige Sondagmiddagete se poeding te peusel nie!

Dit is dalk aan jou meer bekend as 'Chocolate Island Pudding' of 'Mississippi Mudd Pudding', maar hierdie familie resep kom nie sommer in boeke voor nie. Elkeen geslag in ons familie verander en las aan hierdie resep na hartelus en hierdie is my weergawe van die Sjokkie Modder Blokkie*:


24 June 2013

The Reci{P}e

{Poppadums, Potatoes, Pepperdews, Peas , Parmesan & Pitted olives}
This is definitely a ReciPe! Easy to remember {as most of the ingredients start with the letter ‘P’} and just as easy to make! I woke up this morning and decided that I wanted to document my post instead of just writing it. By this I mean, literally writing while cooking – and hopefully not getting my PC caught in the cooking-crossfire!

30 May 2013

{Uniced} Naked Cake Collection!

A dear friend of mine Celesté Prince from Aglow Photography sent me a picture of a ‘Naked Cake’ one day. Little did I know how much I would grow to love this picture! European wedding blogs are going crazy {cakes} about a trend that I think will soon take on in the South African Wedding Cake industry. It’s called Naked Cakes or un-iced cakes. Au natural! I think it’s beautiful! So much of your time as a baker is spend perfection the colour, texture and taste of the cake inside, that I feel it only does justice to also have all of that on display. KoekiesEnCream in collaboration with Jana Jonsson Photography did a shoot last week to put the trend to the test and I must say, I really like the end result. There are just an endless amount of creative ways to display Naked Cakes! Flowers, birds, sweets and lovely treats, all used to decorate these contour cakes – whether it’s for an inside or garden wedding, a girly tea party or just a pretty birthday cake, naked cakes will certainly leave your guest asking {to see} more!
For more information or to order a Naked Cake contact koekiesencream@ymail.com or visit our Facebook page: KoekiesEnCream

{The KoekiesEnCream Naked Cake Collection}


11 April 2013

Fig{de}licious Muffins

This morning I opened the kitchen cupboard and there it was, Pick n Pay Finest Fig Jam! For an early bird I thought well, maybe it might not be such a good idea to start the day with something sweet, but then I thought... wait a minute, let's make another peek-a-boo recipe, a 'surprise' ingredient and that's when recipe popped into my head...Fig Health Muffins. *{See recipe and Easy-to-find Shopping list below}

With winter peeping around every corner, I wanted to have a healthy breakfast to boost my immune system and get some extra fibre into my everyday diet. But...it wouldn't be possible for me to leave out 'something sweet'. So, I came up with a healthy alternative for a grab-and-go breakfast. This peek-a-boo fig jam muffin is perfect. It already has the jam inside the health muffin - perfect for when you are in a rush, having a picnic or surprising your tea-time guests!


3 April 2013

{Mooi in} Rooi Lipsel Rooi Fluweel Tert

Vanoggend toe ek opstaan en my klerekas bekyk, het ek gevoel soos destyds toe ek nog mevrou-mevrou gespeel het, my ma se hakskoene aangetrek het, my ouma se aan'clip' oorbelle gedra het en rooi lipsel aangesmeer het tot bokant en onderkant my liplyne. Die enigste verskil was dat ek nou reeds al 'n 'mevrou' was, my eie pruim-kleur hofskoentjies aangetrek het en my lipsel meer na pruimpienk 'tint' as na rooi - maar van binne het ek nogsteeds soos 'n kind gevoel. Steeds so opgewonde oor die tooisels wat ek myself mee optof en nuuskierig, want wie weet wat die rooi-lip-dag sal inhou! 

Daar is iets hartliks, warm en natuurlik uiters aantreklik aan dié kleur, dis mooi, dis volrond, dis kleurvol, dis ryk, dis diep, dis rooi. Vandag se resep is alles behalwe 'n rooi 'suur pruim'. Dis soet, dis sappig, dis sag...en ek het dit 'gedoop' in rooi, ek het dit gedoop:
Rooi Lipsel-lekker Rooi Fluweel Tert!

24 March 2013

{Peppermint} Chocolate Cupcakes

I posted these lovely St. Patrick's day cupcakes on my Food24 blog a few days ago, although I simply posted the tempting pics! Now for the long awaited recipe! When I first saw a version similar to this recipe on TV I just had to try it for myself. I thought...there can't be a better combination than chocolate, peppermint, buttercream and {my own addition to the recipe} condensed milk in one cupcake!

So, why the wait? ...well, I had to make this delish cupcakes a few times - not because I couldn't get it right, nope, because I simply could not keep up with the amount of orders that came in. I decided to dedicate this Sunday afternoon to sit down and write down the recipe!


11 March 2013

{Milo} Flatervrye Fudge Fees


Flatervrye fudge is nie altyd so flatervry nie. Resepte los gewoonlik die klein oepsies uit van wat dalk kan gebeur wanneer jy fudge maak. 'n Paar wenke wat ek kan gee wanneer jy fudge maak is: {For English recipe click here}
1. Sorg dat AL die bestanddele goed opgelos is. Milo inkluis.
2. Moenie jou plaat te hoog stel nie, anders brand die fudge vinnig vas.
3. Haal die kastrol van die plaat af wanneer jy die geklitste eier by die mengsel voeg.
4. Indien dit sou gebeur dat jou fudge nie wil set nie, geen probleem! Krap die mengsel uit in die kastrol en laat dit op 'n lae hitte weer smelt. Kook dit vir 'n verdere 5 tot 10 minute en gooi die mengsel weer uit om van voor af te set.
5. Die geheim van 'n suksesvolle fudge resep is: Roer! Moet nooit die kastrol verlaat nie, hou aan roer! Of kry iemand om vir jou in te staan ;)

4 March 2013

{Eenvoudige} Elegante Elgin

KoekiesEnCream het die naweek gereis na die lieflike Elgin, waar ons op die plaas genaamd Rockhaven 'n eenvoudige tòg baie elegante troukoek afgelewer het. Die senuwees het soms hoog geloop op Sir Lowry's Pass, met draaie en hobbels wat mens koud laat - veral vir die bestuurder wat weet dat daar 'n troukoek in die motor is!

Maar, wat 'n lieflike rit en soveel te meer die bestemming! Rockhaven is beslis 'n stukkie hemel wat tussen die plase en kronkelpaaie van Elgin en Grabouw versteek is.

{Kleurskema} Die bruid het besluit op wit, navy en 'n tiksel pienk. Sag, eenvoudig en elegant. En die mooiste {en soetste} prentjie denkbaar, om te kan sê: "We do" met ietsie soets!